

So, you want to photograph volcanoes while in Costa Rica? I mean, who wouldn’t want to photograph such an extraordinary and unusual part of nature? Did you know that Costa Rica has six active volcanoes and 61 dormant volcanoes?
Photographing a volcano is quite different from taking family portraits or photographing a waterfall – you could be potentially putting yourself and your equipment in continually changing and sometimes unstable situations.
With that in mind, lets take a look at what it will take to get that perfect picture of a volcano that you can share with friends and family when you get back home. Ready? Lets get started.
The Best Volcanoes to Photograph in Costa Rica
I have written a post on the Volcanoes in Costa Rica but here is short list of the 5 best volcanoes to photograph.
Arenal Volcano – Your typical cone shaped volcano and the most popular
Irazu Volcano – It has two main craters, one containing a green-tinted lake.
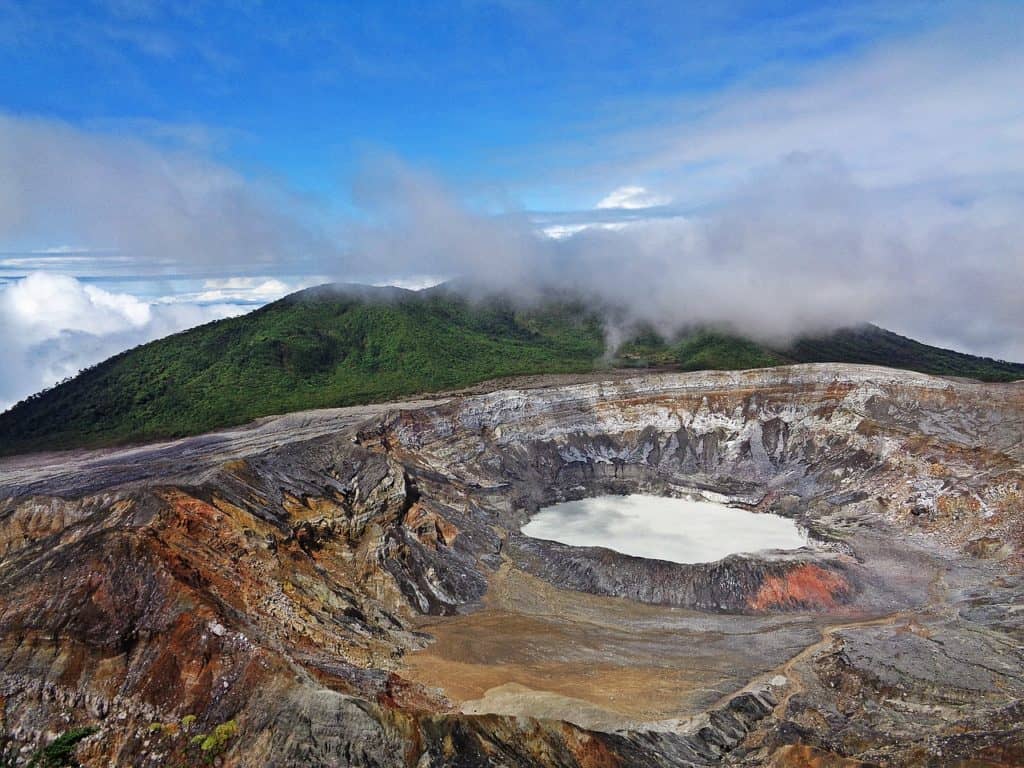
Poas Volcano – One of the world’s largest active volcanoes, with sulfuric emissions, active fumaroles, and two crater lakes
Rincon del la Vieja – Largest Volcano in Costa Rica
Turrialba – The most difficult one to get too but with some fantastic views
Camera Equipment For Volcano Photography
As photographers, most of us pack our photography gear first and then see how much you can shove around your equipment. When photographing volcanoes, you should do the opposite.
Pack your photography gear last. And don’t compromise on the safety gear you’ll need. This a list of the camera equipment and accessories you should take with you when going to Costa Rica.
Cleaning equipment – The most crucial part of your camera gear you’re going to pack outside of the camera itself! Even with all the protection, your camera is still likely to pick up some lava dust. Clean your camera after use with canned air, camera blowers, and clothes.
A simple and inexpensive kit like this one from Amazon is good place to start.
Camera body – I really can’t recommend a specific camera as they change so quickly and everyone’s budget is different. However, I would get one from one of the big 4 camera makers such as Fuji, Sony, Nikon or Canon.
Whatever one you go with, I would recommend that you get one that you can changes lenses with and that is dust and weather-sealed.
It is important that regardless what camera you use, take enough batteries along. Long exposure photography is common when photographing a volcano and it significantly drain camera batteries.
Lens – There are two tactics with lenses I suggest for photographing volcanos. For active volcanoes, mid and long focal length lenses, 24 – 105mm, 100 – 400mm, are the zoom lengths. For dormant volcanos, which are almost all the ones you will find in Costa Rica, you should bring a wide-angle zoom lens like a 16-35mm.
PRO TIP: Try not to change your lens on location too much, especially if its windy. This will help avoid getting dust onto your sensor.
Tripod – When photographing a volcano, you can almost be guaranteed that there is going to be wind, especially the closer you get to the top, so having a sturdy (yet lightweight) tripod is must. If you can afford one made from carbon fiber, I would go this route.
A company like Mefoto has a variety of good tripods and is good place to start.
On a side note, when using a tripod you should have cable release. They are inexpensive, lightweight and very useful in avoiding camera shake.
Camera raincoat – The best way to protect your camera is to prevent it from getting dirty in the first place. Adding a layer of protection to it makes sense.
Filter – A UV filter will protect the front of your lens. Ash from previous volcanic eruptions can get into the lens. A UV filter will offer protection from various detritus found in volcanic areas.
The size filter you will need will depend on the lens you take with you. The most common is 77mm but double check before purchasing.
Volcano Photography
When you want to photograph a volcano, as we’ve discussed, many factors play into capturing the “National Geographic type” image that you might be imagining. Significant aspects, like knowing the history of the volcano’s eruption history.
Things you might want to research are things like, is the volcano you’re planning to visit currently erupting? When was its last eruption? Does it have a history of small explosions and then a colossal one?
If you want to photograph an actual eruption, you’ll want to keep an eye on what’s currently erupting or showing signs of unrest. You can research and follow several websites to ensure that you are tracking the volcano’s history accurately.
Remember to shoot both wide and tight images. You will have the opportunity to shoot very wide from as little as 16mm to very closed down as far 500mm in some cases, so if weight or baggage is not issue for you, make sure to have all your lenses available and keep an eye out for different types of compositions.
Photographing a Volcano During the Day
When shooting a volcano in Costa Rica during the day, you should be shooting with faster shutter speed. With good lighting you should not shoot under 1/500th of a second. Also make that you have your auto focus turned on, there can be a lot of movement when shooting an active volcano in Costa Rica.
My next recommendation is to have a wide aperture. On a sunny day start at f/8 and start bracketing to find your perfect exposure.
Another setting you will want to watch is your ISO, when it is bright and sunny out you will want to start shooting with your ISO set at 200 or less if light permits but again this is a situation where these setting can get you started and you can adjust from there based on all the factors.
Photographing a Volcano at Night
Photographing volcanoes and lava in particular at night is much harder than other aspects of night photography. There is constant movement, but you want to capture the glow of the lava without the image blurring.
Normally when you are shooting at night you have a low shutter setting and a higher ISO. This enables you to capture all the light in the scene without having your image become grainy with a high ISO (like ISO 2000).
Shooting lava is challenging, you will need to be shooting at a higher ISO and faster shutter speed with a very wide aperture. For example, shooting at night in Costa Rica, your settings should start at ISO 800, shutter speed 1/400th and aperture f/5.6.
You will have to play with your settings depending on the lighting in your condition and how bright the lava flow is but this setting will get you started.
Safety Equipment
Since this isn’t a typical subject you are photographing, you might need or want some special equipment to safely ensure you and your camera equipment return from your photographic adventure.
If you are going with a guide, you will want to ask if they supply some of all of this equipment. If not, you might want to invest in some or all of this equipment to have on hand. Volcanoes in Costa Rica can present several hazards, especially if you’re going to get close to any lava flow that might be coming from it.
Helmet – The most significant hazards around volcanos is the falling rock (or lava bombs). When you are wearing a helmet, you get a level of protection from these hazards.
First aid kit – Always plan for the unanticipated injuries and bring a first aid bag with extra water bottles.
Gas mask – One thing that a lot of people might not think about when around lava is that there can be life-threatening gases in the air. You should bring a gas mask to counter this.
Heat resistant clothing – Of course, hiking towards lava and an active volcano, you might want to think about investing in extreme heat resistant clothing. Getting close to the lava is risky business, and I’m sure you don’t want to catch fire.
Hiking Boots – Since your feet will need a good pair of hiking boots to climb volcanos. Volcanic scree is treacherous to walk on and will tax your energy as well.
Light Layers For Warmth – Even if you’re climbing volcanos in the tropics, you’ll still need warm clothing. You would be surprised how cold it can become suddenly when photographing near a volcano. Best to be prepared!
CAUTION: None of these safety items will protect you against a pyroclastic flow.
Finding The Best Photo Spot
Unfortunately, I cannot tell you where to go specifically for each volcano in Costa Rica. Choosing the best place to photograph a Volcano is a subjective matter.
It really depends on what you like about Volcanoes and photographic story you want to tell. It also hard to say how close you are comfortable in getting to the volcano. However, I would say that, if you have the time and will, take photos from both far away and close up.
If you can, hire a local who knows the area well and can take you some of the better spots to photograph from, it would be well worth the investment.
Each volcano in Costa Rica is different as well as seeing what the weather is like on that day, so you’ll need to see these places for yourself to decide whether where would be the best spots take photos from.
I hope that you have enjoyed this short break down on how to best prepare and photograph a volcano in Costa Rica!